Easiest Way to Make Tasty chicken ground sirloin and pasta

chicken ground sirloin and pasta. The Best Ground Sirloin Recipes on Yummly Top ground sirloin recipes and other great tasting recipes with a healthy slant from SparkRecipes.com. broccoli cheddar chicken. Full ingredient & nutrition information of the Sirloin Burgers (Fresh Ground Homemade) Calories.

chicken ground sirloin and pasta 
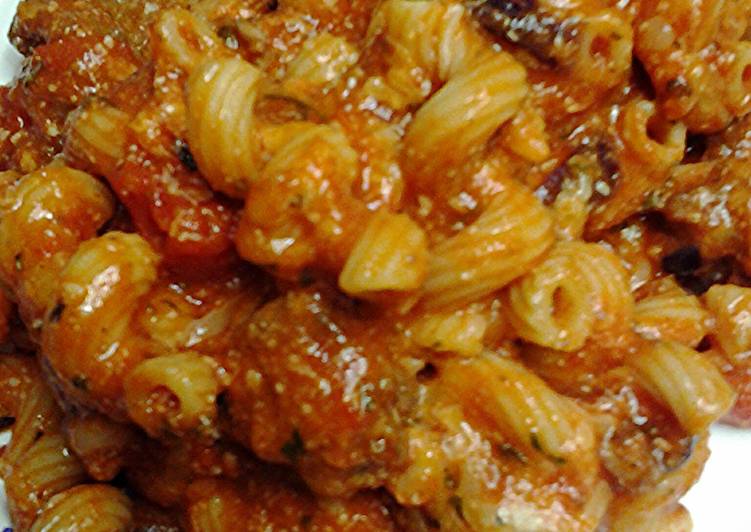
Rotini pasta tossed with chicken, bell pepper and a creamy herb sauce–all prepared on the stovetop! Breaking up clumps with a wooden spoon. I didn't have ground sirloin from my butcher box so I the free ground beef they sent me instead. You can cook chicken ground sirloin and pasta using 18 ingredients and 6 steps. Here is how you cook it.

Ingredients of chicken ground sirloin and pasta

  1. Prepare 1 lb of ground sirloin, beef.
  2. It’s 1 1/4 lb of chicken breast.
  3. Prepare 2 cup of shredded colby jack cheese.
  4. You need 1 lb of corkscrew pasta.
  5. Prepare 2/3 cup of grated parmesan cheese.
  6. It’s 1 large of red/purple onion.
  7. It’s 1 tsp of salt more if needed to taste.
  8. You need 1/4 cup of sugar.
  9. Prepare 1 tsp of dried basil.
  10. You need 1 tsp of whole leaf oregano.
  11. You need 1/2 cup of parsley.
  12. It’s 1 tbsp of Hungarian paprika.
  13. It’s 1 tbsp of granulated garlic powder.
  14. Prepare 1 tsp of grains of paradise.
  15. You need 29 oz of can of diced tomatoes.
  16. You need 29 oz of can of tomato puree.
  17. You need 15 oz of can of tomato sauce.
  18. It’s 1/2 cup of cabernet- merlot by yellowtail.

I'll try to use sirloin next time. I also did not have cayenne. Our most trusted Chicken Fajitas With Ground Sirloin recipes. Reviewed by millions of home cooks.

chicken ground sirloin and pasta step by step

  1. Cook pasta according to instructions on box.
  2. Drain pasta.
  3. Add parsley to the pasta and mix well.
  4. Cook the chicken and beef cut into bite sized pieces I usely buy sirloin patties or form into patties cook and cut it to desired size.
  5. Add onions to meat the red onions will absored all liquids let cook then deglaze the pan with wine let cook down watch closely the red onion is very thirsty even more so then a yellow or white.
  6. While thats set aside add to a pot aall rhe other ingredients and then add meat cook for 15 -20 minutes.

I kept the sauce separate from the cooked pasta and packaged up four servings. Meanwhile, bring a large pot of water to a boil, add a tablespoon of salt, a splash of oil, and the pasta, and cook according to the directions on the box. Healthier and more affordable than ground beef, it cooks quickly and freezes well (hellooo, leftovers). Your favorite soup just got a serious upgrade. Tip: Make extra meatballs for the freezer and team them with buttery pasta.

Recipe: Delicious 20 minutes carbonara

20 minutes carbonara. My version of the classic Carbonara. This i's a very simple edition, with no cream in it. Should you think this dish looks dry, have no fear.

20 minutes carbonara 
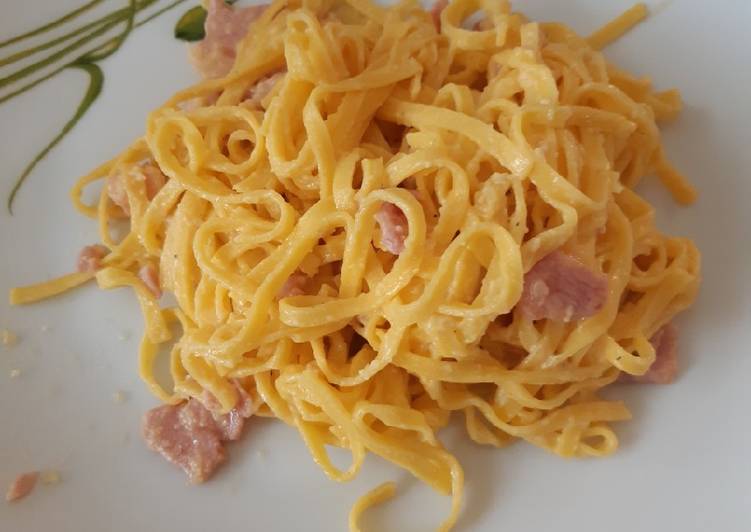
There's a lot to love about pasta carbonara: it's silky, rich and always tastes amazing. When you're craving a comfort food, nothing will cure you like creamy carbonara. It's an insanely easy dinner recipe that ANYONE can make. You can cook 20 minutes carbonara using 6 ingredients and 4 steps. Here is how you achieve it.

Ingredients of 20 minutes carbonara

  1. You need 185 g of organic back bacon.
  2. It’s 300 g of fresh linguine.
  3. It’s of Olive oil.
  4. It’s 1 of egg and 3 yolks.
  5. It’s 75 g of Parmesan cheese.
  6. It’s of Garlic granules or 1 clove of garlic.

When you're craving a comfort food, nothing will cure you like creamy carbonara. Perfect for a quick weeknight dinner. This has gotta be the world's most creamy, cheesy, smoky, 'bacony' vegan carbonara. An easy weeknight dinner for families and kids, or if you've just had a long day and need.

20 minutes carbonara step by step

  1. Chop bacon and sautee with a splash of olive oil.
  2. Mix eggs with cooked bacon and parmesan cheese..
  3. Cook the linguine as per pack instructions.
  4. Drain pasta add the sauce and serve immediately with extra parmesan to sprinkle.

This quick and easy spaghetti carbonara recipe is a twist on the classic dish using Marmite which gives it a delicious flavour. Melt the butter in a large frying pan (skillet) and add the onion and mushrooms. Carbonara – an easy Italian pasta made with your average breakfast ingredients. I love that it comes together with mostly. This Eggless Spaghetti Carbonara is the perfect way to get your carbonara fix without the eggs.

Recipe: Perfect Blackened Chicken Mirepoix Zucchini Noodle Soup

Blackened Chicken Mirepoix Zucchini Noodle Soup.

Blackened Chicken Mirepoix Zucchini Noodle Soup 
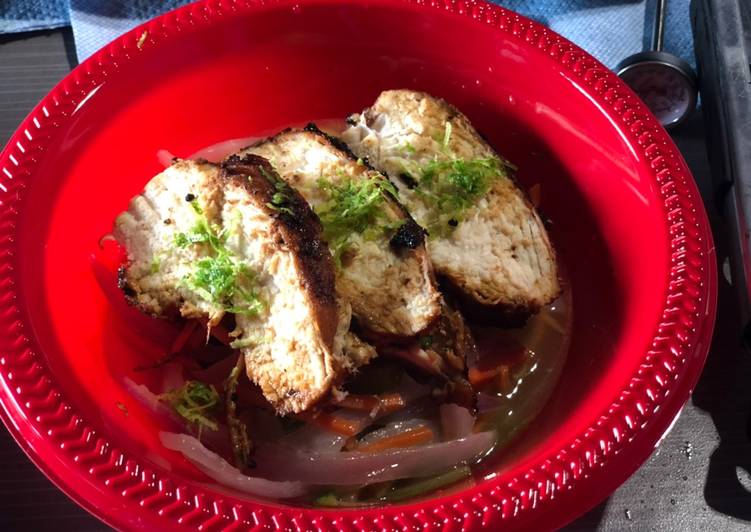
You can cook Blackened Chicken Mirepoix Zucchini Noodle Soup using 19 ingredients and 6 steps. Here is how you cook that.

Ingredients of Blackened Chicken Mirepoix Zucchini Noodle Soup

  1. Prepare of Chicken.
  2. It’s 1 lb of Chicken Breast.
  3. It’s 1 tbsp of Olive Oil.
  4. It’s 1 tbsp of Butter (Unsalted).
  5. Prepare 1 tbsp of Cayenne Pepper.
  6. You need 1/2 tbsp of Ground Parsley Flakes.
  7. It’s 1 tbsp of Ground Orange Peel.
  8. You need 1/2 tbsp of Grillin Mates Mesquite BBQ seasoning.
  9. You need of Salt and Pepper.
  10. You need 1 of Lemon, zested and juiced.
  11. It’s of Mirepoix.
  12. Prepare 1/2 of Red Onion sliced (long strips).
  13. Prepare 3 of Celery (chopped 1/4” pieces).
  14. It’s 3 of Carrots, Shredded thinly.
  15. Prepare 1 tbsp of Butter.
  16. Prepare of Soup.
  17. Prepare 1.5 of Zucchini’s (spiraled).
  18. Prepare 1 cup of Chicken Broth.
  19. You need to taste of Salt and Pepper.

Blackened Chicken Mirepoix Zucchini Noodle Soup instructions

  1. In a skillet on low heat, melt butter. Added carrots, celery, and onion. Stir occasionally until translucent. The point of Mirepoix is to bring out the flavors in the veggies, rather than browning (sauté)..
  2. Meanwhile pat dry both sides of the chicken to remove outer juices, and season both sides and rubbing it into the meat..
  3. Heat another skillet medium-high heat. Add in oil to coat. Place in chicken and do not move for 6-8min. About halfway through, add in butter and let it froth. Coat the top of the chicken with a spoon (saucing). Flip (it may look slightly burnt, but that’s the goal). Continue to sauce the other side until about 165°-170° for at least 6min. Remove and let rest..
  4. In same skillet, reduce heat and let zucchini noodles (patted dry and salted) sauté for about 3min. Add chicken broth and let simmer..
  5. Slice about three strips of chicken per bowl, layer the bottom of the bowl with zucchini noodles and then pour some broth in about level to the noodles. Next, add in the Mirepoix, and top off with the chicken. Finally, squeeze a 1/4 wedge of lime lime over the chicken, and top it with some lime zest..
  6. Serve and Enjoy!.

Easiest Way to Prepare Perfect Chicken and Shrimp Gratin

Chicken and Shrimp Gratin. I've learned this Gratin recipe from japanese book,this is the common way of how the Japanese cook gratin recipe,some are made with vegetables such as. Stir in wine or chicken stock, set aside. Spoon into a buttered or greased casserole dish.

Chicken and Shrimp Gratin 
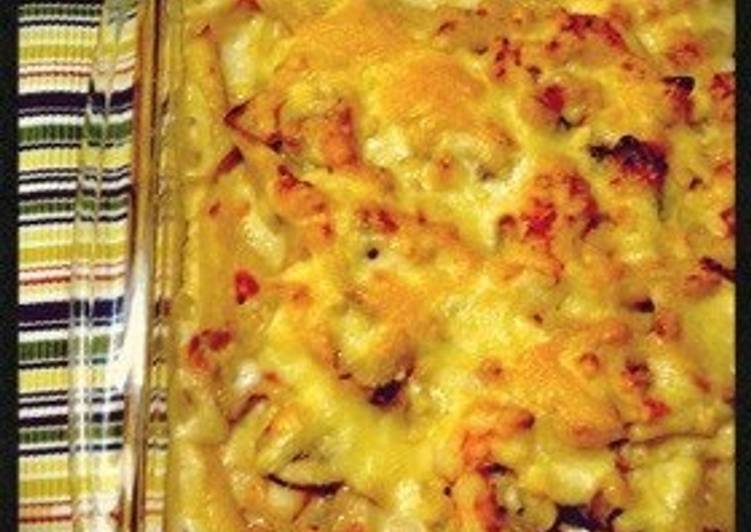
The chicken and shrimp cook together in the. Creamy, cheesy white sauce flavored with curry enfolds the pink shrimp and rice in this easy casserole. This collection of top-rated recipes highlights this versatilty, featuring chicken thighs with international accents, from chicken curry to cacciatore, chicken teriyaki to chicken tagine, biriyani. You can have Chicken and Shrimp Gratin using 14 ingredients and 10 steps. Here is how you cook it.

Ingredients of Chicken and Shrimp Gratin

  1. Prepare 200 grams of Short pasta (macaroni, penne, etc).
  2. It’s 200 grams of Chicken thighs.
  3. Prepare 100 grams of Shrimp.
  4. You need 1 of Canned corn kernels.
  5. Prepare 10 of Mushrooms.
  6. You need 1/2 of Onion.
  7. It’s 1/3 of Carrot.
  8. It’s 600 ml of ◎Milk.
  9. You need 50 grams of ◎Butter.
  10. You need 5 tbsp of ◎White flour.
  11. You need 100 grams of Pizza cheese (suggested amount).
  12. It’s 1 of Grated Parmesan cheese.
  13. Prepare 1 of Salt and pepper (or white pepper).
  14. It’s 1 of Oil.

Shrimp gratin stock photos at the best stock photography agency with millions of premium high quality, royalty-free stock photos, images and pictures at reasonable prices. Chicken rubbed with classic rotisserie chicken flavours, roasted on top of a potato gratin so the chicken juices flavour the potato. You would think searching "Chicken and potato" on the Gourmet Traveller website would locate it….but no….(**Update: Found it! This chicken gratin recipe is warming and comforting – perfect when the nights are long and chilly.

Chicken and Shrimp Gratin instructions

  1. Boil water in a pot. When the water starts to boil, add salt, cook the pasta, then drain in a sieve. Toss with oil to prevent drying..
  2. While cooking the pasta, roughly mince the onion and carrot. Slice the mushrooms lengthwise. Cut the chicken and shrimp into bite-sizes..
  3. Pour oil in a pot or a deep frying pan, and stir-fry the onion and carrot over medium heat. When the onion is translucent, add chicken and shrimp..
  4. When the surface of the chicken turns white, add mushrooms, and stir thoroughly..
  5. Turn down the heat to low. Add corn and butter. When the butter is melted and the ingredients are coated with butter….
  6. Add flour, and mix together. The wooden spatula will feel a little bit heavy..
  7. Pour in the milk in 2 batches. In the first batch, pour and blend in. Pour in the second batch until it thickens. Sprinkle salt and pepper..
  8. Turn off the heat, add pasta from Step 1, and mix. If the pasta starts to stick together, separate while mixing..
  9. Preheat the oven to 210℃ (410℉). When you are using a oven, set to the gratin setting. Pour the Step 8 mixture into a heatproof dish, and sprinkle pizza cheese and Parmesan cheese..
  10. Bake in the oven for about 15 minutes, and it's finished Brown to your liking by adjusting the amount of cheese and temperature. Adjust the baking time to your oven..

This recipe for shrimp and grits starts with a clever tip for jump-starting the grits that I learned from Southern chef Sean Brock. You combine the grits and their cooking water (plus bay leaves for aroma) and bring them quickly to a boil. Then, remove the pot from the heat, cover, and let the warm water. Introduce a little luxury to a creamy chicken and potato gratin by adding truffle. A great comfort dish to serve in winter, or when you want something special.

How to Cook Tasty Crock Pot Roast and Potatoes

Crock Pot Roast and Potatoes.

Crock Pot Roast and Potatoes 
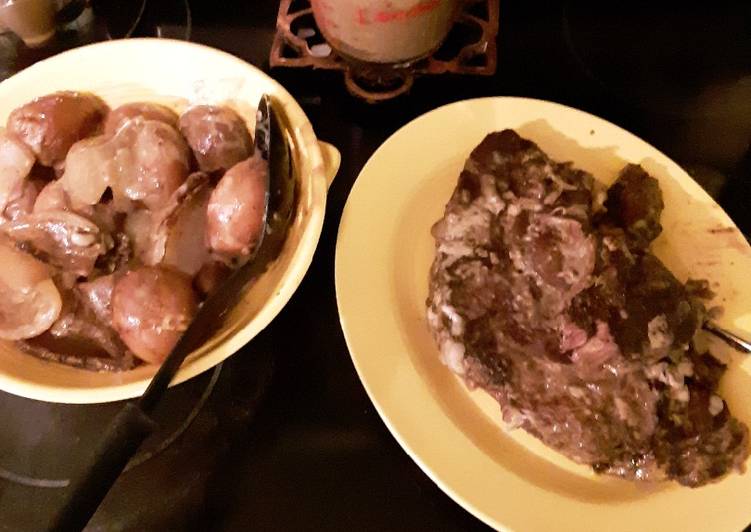
You can cook Crock Pot Roast and Potatoes using 6 ingredients and 4 steps. Here is how you achieve that.

Ingredients of Crock Pot Roast and Potatoes

  1. You need 2 1/2 lb of chuck roast.
  2. It’s 1.5 lbs of red potatoes.
  3. You need 1 of large yellow onion.
  4. You need 1 (22 oz) of can cream of mushroom soup.
  5. You need 1 pkg of dry onion soup mix.
  6. You need of Black pepper.

Crock Pot Roast and Potatoes step by step

  1. Wash potatoes and put in crockpot..
  2. Cut onion into largish bite size pieces and add to crockpot with potatoes..
  3. Put roast on top, sprinkle on onion soup mix, pepper, and pour in cream of mushroom and cook on low for 6-8 hours or 4-6 hours on high..
  4. With the two soups and the juices from the roast, this will make its own gravy, just pull out the meat and potatoes and stir, you will have to let it sit for a few min then spoon off the fat..

Easiest Way to Make Tasty Shepherd's Pie

Shepherd's Pie. .with the kind of refrigeration we had in our homes, cooked meat could be kept much more safely than raw. Therefore, when housewives bought their Sunday meat they selected pieces large enough to. Shepherd's Pie comes to us from England, and is traditionally made with lamb or mutton.

Shepherd's Pie 
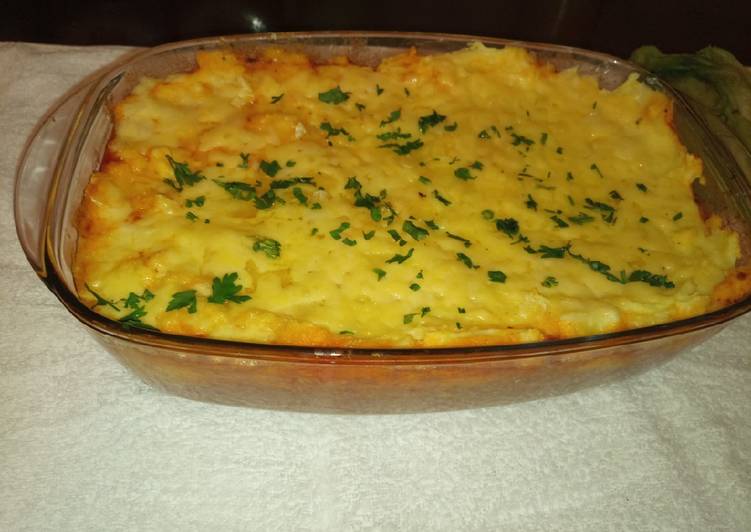
Expect the best shepherd's pie in Singapore. Premium ground beef, fresh local greens and hand-whipped mashed potatoes. Savour a spoonful of goodness everytime. You can cook Shepherd's Pie using 12 ingredients and 9 steps. Here is how you cook that.

Ingredients of Shepherd's Pie

  1. You need of Minced meat.
  2. Prepare of Garlic.
  3. Prepare of Ginger.
  4. It’s of Tomato.
  5. You need of Onion.
  6. Prepare of Tomato paste.
  7. Prepare of Irish Potato.
  8. You need of Cheddar cheese.
  9. It’s of Whipping cream.
  10. It’s of Milk.
  11. You need cubes of Chicken.
  12. You need of Coconut cream.

Shepherd's Pie is the sort of food that brings a smile to everyone's face! That saucy, deeply flavourful filling, that creamy potato topping, and that awesome golden cheese crust.… While Shepherd's Pie is. This family friendly shepherd's pie uses ground beef (instead of the traditional lamb), and your Instant Pot® or multi-cooker pressure cooker to prepare the filling and potatoes. This easy Shepherd's Pie recipe is filled with lots of veggies and tender ground beef (or lamb), simmered together in the most delicious sauce, and topped with the creamiest mashed potatoes.

Shepherd's Pie instructions

  1. Wash and chop the ingredients and set aside..
  2. Boil the Potatoes in a separate sufuria..
  3. Cook the onions,ginger,garlic,tomato and tomato paste. Ensure you the sauce is juicy…
  4. Add the minced meat and after 15minutes pour in some coconut cream for taste and a creamy sauce..
  5. Pour in the minced stew in a casserole dish and then layer on top the creamy mashed potatoes..
  6. Drain the Potatoes and pour in some whipping cream and milk.(quantity is dependant on your guest)..
  7. Pre heat the oven..
  8. Grate the Cheddar cheese on top and bake..
  9. Enjoy your Shepherd's Pie…

Shepherd's pie is a classic comfort food recipe that's healthy, hearty and filling. The bottom layer is a simple a mix of ground lamb and vegetables, simmered into a delicious savory sauce. Plunge your spoon into a shepherd's pie with creamy mash and flavourful lamb mince. We've got traditional recipes, plus spiced and vegetarian alternatives. Try the classic shepherd's pie recipe or mix it up with a veggie shepherd's pie with lentils, or add parsnips to your mash like Nigel Slater.

How to Cook Tasty Mike's NY Cheesecake 101

Mike's NY Cheesecake 101. Want to know how to make an easy no-bake cheesecake or a new york style baked cheesecake? All of our cakes are made with the finest ingredients, without any preservatives or additives! Cheesecake poppers are great for any occasion.

Mike's NY Cheesecake 101 Baked cheesecake has a richer taste and creamier texture as compared to no-bake cheesecake, but the process of making has more steps than the no-bake. To yield a nice cheesecake without cracks on top, it needs to be baked using water bath at low heat. Using quality ingredients, such as Philadelphia Cream Cheese, is the first factor to making a flavourful cheesecake with a perfect creamy texture. You can have Mike's NY Cheesecake 101 using 21 ingredients and 61 steps. Here is how you achieve it.

Ingredients of Mike's NY Cheesecake 101

  1. Prepare of Cheesecake Ingredients (use all at room temperature).
  2. It’s 30 of Graham Crackers (crushed for crust).
  3. You need 4 tbsp of Sugar (for crust).
  4. You need 4 tbsp of Melted Salted Butter (for crust).
  5. It’s 4 packages of Philadelphia Cream Cheese.
  6. You need 1 tbsp of Vanilla Extract.
  7. Prepare 1 cup of High Fat Sour Cream.
  8. It’s 1/4 cup of All Purpose Flour.
  9. Prepare 3/4 cup of Whole Milk.
  10. Prepare 1 1/2 cup of Sugar.
  11. It’s 4 of Fresh Eggs.
  12. You need 1 of Garnish Of Your Choosing.
  13. You need of Cooking Aids.
  14. It’s 1 of Spring Form Pan (with a smooth base-no texture).
  15. You need 3 of 18" x 18" Sheets Tinfoil (nothing smaller or you will end up with a soggy cake).
  16. You need 1 can of Pam Butter Spray.
  17. Prepare 1 of Set Measuring Spoons.
  18. It’s 1 of Set Measuring Cups.
  19. You need 1 large of Mixing Bowl.
  20. You need 1 of Plastic Spatula.
  21. Prepare 1 of Electric Beater.

New York cheesecake bars will impress your friends and family. Creamy delectable cheesecake, great for that special brunch with friends or family gatherings. We needed another treat for a gathering of friends and I wanted something different. A nice cheesecake bar sounded just right.

Mike's NY Cheesecake 101 instructions

  1. Preheat oven to 350° (175 degrees C)..
  2. Triple wrap the outside of your spring form pan tightly with tinfoil. Make certain there are no holes or tears in the foil that water can seep through..
  3. Spray Pam a 9 inch spring form pan. In a medium bowl, mix graham cracker crust crumbs with melted butter. Reserve a small amount of your crust after mixing. Press on to bottom of spring form pan and halfway up the sides. Note: I use a few stiff paper plates that are stuck together and press down firmly with that. This will make a thicker, more sturdy crust than the average. If using boxed, crushed Graham Crackers, double the amount the recipe calls for one pie crust..
  4. Bake crust in oven at 350° for 8 to 9 minutes on the bottom 1/3 rack of your oven..
  5. After baking, fill in any cracks with additional graham cracker crust. Press firmly but gently again..
  6. Let crust cool quickly in fridge or freezer..
  7. In a large bowl, mix cream cheese just until smooth..
  8. Blend in milk and sugar in cream cheese until just blended. Then mix in the eggs, one at a time, mixing just enough to incorporate..
  9. Mix in sour cream, vanilla and flour just until smooth..
  10. Pour filling into cooled, prepared crust and flatten with plastic spatula or spoon..
  11. Place your spring form pan in a roasting pan and fill it with boiling water until it's half way up your spring form pan. Place cake and roasting pan on the same 1/3 rack you baked your crust on..
  12. Put cake in oven immediately and bake in preheated 350° oven undisturbed for 1 hour..
  13. Turn the oven off and allow the cake to cool in oven with the door closed for 5 to 6 hours absolutely undisturbed. Do not open the oven door. The trapped moisture should prevent any cracking..
  14. Chill in refrigerator until serving..
  15. Serve Cheesecake at room temperature. One hour prior to serving, place chilled fruit garnishments on your cake or you can serve it plain..
  16. FORTY CHEESECAKE TIPS! *Listed below are 40 tips to help ensure your cheesecakes aren't dry, don't over brown at the edges, don't crack or have the crust fall apart. There are also tips on batter mixtures, cooking times, falling cakes, garnish options and so on. In short, almost everything you'll need to know to make the perfect cheesecake every time. Just note that no advice will absolutely guarantee that your cake will not crack or split, however, if you follow these basic tips, you'll have a better chance than most..
  17. TIPS FOR CHEESECAKE CRUSTS:.
  18. #1 Always pre-bake your crust for 8-10 minutes. Regardless if the recipe doesn't necessarily call for it..
  19. #2 Preheat your oven to 350°. Make your graham cracker crust and press it into the base of your spring form pan firmly and just slightly up the sides. Withhold a small amount of crust mixture and set to the side covered. After you've laid your crust in your spring form pan, place it on the bottom 1/3 rack of your oven and bake 8-10 minutes..
  20. #3 Your crust will probably call for butter. Consider using a quality salted butter like Tillamook to negate some of that sweetness if using a candy topper or overly sweet garnish..
  21. #4 After baking, press crust again until it's even. Use the remaining graham cracker mixture to fill in cracks if any. I use a paper plate to press the crust evenly. Let crust cool quickly in fridge or freezer..
  22. #5 Have every ingredient at room temperature, even the sugar. This will help tremendously with your mixing and blending..
  23. #6 Using cold cream cheese in your mixture will cause lumps. However, if you do find yourself with lumps anyway, run mixture through a sieve (tight strainer) and squeeze through with spatula. Or you can spin mixture very quickly in a food processor..
  24. #7 Don't use cream cheese in a tub or bucket of any kind. Whipped cream cheese has far too much air in it to make a sturdy or functional cheesecake..
  25. #8 Use quality cream cheese bricks that are high in fat. The same with your sour cream-high fat. These will make the best cheesecakes. It's not exactly the healthiest option but hey, what's life without a little whimsy?.
  26. #9 When mixing your cheesecake ingredients, be careful not to over beat them. You'll want your mixture smooth yes, but my best advice is, "Dont be confused by anyone else. Do exactly as the author of the recipe advises you to do since they've not only experimented with the recipe but obviously made the same recipe many, many times before." Just remember though, less mixing is better for the cake..
  27. #10 Try this if you're worried about over mixing: Beat your softened, room temperature cream cheese first, then add all of your additional ingredients one at a time. (or as your author recommends) You won't have to blend as much and risk over beating..
  28. #11 Another way of softening your cream cheese is place your brick in the microwave for 15 seconds. 15 additional seconds for every brick you have in the microwave alongside another..
  29. #12 Also, you can add 3 1/2 tbs AP flour to your batter if your recipe doesn't already call for it. All purpose flour helps keep your cake from splitting and the flour doesn?t tamper with the taste whatsoever. However, it does effect the texture but not enough to make a huge difference. The benefits of adding a starch include: Your cake isn't as apt to rise in the middle during baking and eventually sink in the center. Your cakes top will be flatter and smoother than without it. Flour will also almost eliminate that dry, dark brown and raised/hardened edge cheesecakes are synonymous for..
  30. #13 It is important to note that cheesecake recipes that contain even a small amount of starch, i.e., cornstarch or flour, will produce a more cake-like texture. Cheesecakes that do not contain starch tend to be more smooth, creamy and heavy so choose your recipe wisely if you do have a preference!.
  31. #14 Time wise, cook your cheesecake as per your authors directions BUT leave your cake in the oven after the baking is completed for a minimum of 2 hours. I know some say 1 hour, some say 6 hours and some say 5 minutes. However, I've always had the best of luck with leaving it at minimum (if hurried) of 2 hours undisturbed with the oven door closed and a maximum of 6 hours. In my opinion, even if your recipe doen't call for this step and you have the extra time, do it anyway..
  32. #15 No poking, no shaking and no toothpicks if checking for doneness during or after baking. In fact, don't check for doneness at all. Find a solid recipe with high ratings and trust it..
  33. #16 Speaking of your cake shaking, your cheesecake will shake a bit at its completion but by leaving it in the oven and the cakes refrigerator sitting time, I promise your cake will firm up!.
  34. #17 When you cake is setting up, do not peak at the cake [even while baking] and do not open the oven door under any circumstances. Here's why. This will let the moisture escape from the hot water bath within the oven and will cause cake cracking and potentially dry your out your cheesecake. The point of the hot water bath is moisture, moisture, moisture!.
  35. #18 If you find you do have some minor cracking on top, a simple cream cheese frosting will cover those right up and put a silky sheen atop your cheesecake. A garnish (fruit or otherwise) will do the same so no worries!.
  36. TIPS FOR BAKING CHEESECAKES: #19 Do not use a spring form pan that has a raised pattern on the base of the pan. You'll want your base absolutely smooth, otherwise your crust will stick inside those indentations making it much harder to transfer your cheesecake to your serving platter. In short, your entire cake will break up entirely or in half as you try to lift it..
  37. #20 Preheat oven as per the authors directions for your specific cheesecake recipe. Take [3] 18" x 18" pieces of heavy duty tin foil and CAREFULLY wrap one sheet around the outside of your spring form pan, barely crimping the foil neatly and tightly over the top of pan. Be careful as to not make any holes in the tinfoil whatsoever. If you do, discard that foil and start over with a new sheet. Do the same thing again and again with the second and third sheet of tinfoil. Remember folks, no holes. This will keep the fluid from the hot water bath [listed below] from seeping through to your cheesecake..
  38. #21 Some professional Baker's have reported that using extra large Turkey Baking Bags work pretty good as well for keeping water out. However, I would still use them in conjunction with tinfoil for precautions sake. Mishaps occur all the time with hot water baths..
  39. #22 After wrapping your spring form pan that already contains your baked crust, fill your pan with your cheesecake mixture and level it neatly with a plastic spatula or spoon..
  40. #23 Don't tamp your unbaked cheesecake mixture on the counter after pouring and leveling it if you see air pockets. You'll shatter your crust and it will fall apart upon serving..
  41. #24 Place your spring form pan inside a deep roasting pan in the same bottom 1/3 rack as you baked your crust upon. Now, fill your roasting pan with piping hot water from a tea kettle until it's risen halfway up your cheesecake pan. Usually it takes about 1 1/4" of water. Be careful not to burn yourself reaching in the oven while filing your pan. This method is slightly safer than filling the roaster outside of the oven and setting your cake in boiling water. All the while hoping you didn't rip the foil as you try to balance everything without scalding yourself just sounds a bit more dangerous to me..
  42. #25 Another option: Instead of placing your spring form pan inside a roasting pan is to place an oven safe pan filed with rapid boiling water to the side of your cake pan in the oven. It's not as effective but it does work! Moisture is moisture!.
  43. #26 When you finally pull the cheesecake out, place it in the fridge and chill for at least 4 hours but longer is better for your cake..
  44. #27 When you're cheesecake is ready to be unhinged, a good tip is to use a hairdryer to heat up the spring form sides and use a clean, thin, warm butter knife to separate the cake from the pan walls then unhinge pan. Some Bakers even use the knife method just as the cake is done and then quickly put the cake back in the oven to let it sit for a few hours..
  45. #28 After a long chill time and unhinging your spring pan, use two large spatulas to pick up your cake and move it safely to a serving platter..
  46. #29 If your recipe calls for you to take your cake directly out of the oven and plate asap, it's a good idea to lightly butter the outside edges while the cake is still warm..
  47. #30 If you intend on freezing your cake, double wrap your firm, 4 to 5 hour refrigerated cheesecake air tight with plastic wrap and tinfoil. But before you wrap it, freeze the cake uncovered for at least 30 minutes so it can firm up enough to handle the double wrap without denting or mis-shaping it..
  48. #31 A frozen cheesecake can last up to 2 months in the freezer but 1 month is typically recommended. To de-thaw your cake, just place in the refrigerator for 24 hours..
  49. #32 Cheesecake should always be served at room temperature so take it out of the fridge 45 minutes early unless the weather is very warm. 25-30 minutes will take it to room temperature..
  50. #33 Always garnish your cheesecake 1 hour before serving. Have your canned or fresh fruit in the fridge so it's fully chilled when you're ready to top and serve. Remember, the cheesecake should be at room temperature but a chilled fruit garnish is always desired and appreciated!.
  51. #34 There's no need to purchase expensive fruit cheesecake toppers. In fact, one of the best cheesecakes I ever tasted was made with seven tablespoons of warmed, quality, multi-berry jam swirled within the cake and baked!.
  52. #35 Most seem to think that a cheesecake MUST have a topping or theme of some type. However, have you've ever noticed that plain cheesecakes are usually the first to run out at a party or reunion? My theory? It's probably because the most of us are simply fickle by nature. Some like cherry but prefer strawberry. Some adore blueberry but don't want to stain their teeth in public. Some enjoy pineapple but claim it gives them canker sores so
    they decline. Some even gag at the smell of pumpkin. With that, [other than the lactose intolerant or extreme dieters] most end up choosing the pain ole' moist, delicious piece of cheesecake rather than going without. So don't fear the void folks!.
  53. #36 Cheesecake is a lot like Sushi. In order to get a brilliantly clean cut, fill a bowl with steaming hot water and dip your knife in it until it's heated. Have a clean towel handy to clean your knife blade in between each slice. Viola! You'll have perfect slices every time!.
  54. #37 Never use anything other than quality cream cheeses in your cheesecakes. Even if there is a sale on generic cream cheese touting 500 bricks for $2.00. While you can purchase the more expensive cheeses at a deli, the best cream cheese out there for the price is Philadelphia Brand Cream Cheese..
  55. #38 Always make sure you look for any special instructions (i.e., high or low altitude or barometer precautions) in your recipe..
  56. #39 As I understand it, some of the most famous cheesecakes baked at 3 to 5 star restaurants worldwide employ the low and slow methods of baking their cheesecakes. They start out at 350° then reduce to 275° and bake for 1 1/2 hours. After baking, they leave their cheesecakes in the oven and don't open the oven door for at least 4 hours. They also employ the hot water bath technique. So, if you come across any recipe that mimics anything like theirs, give her a try!.
  57. #40 Kids love to help decorate and if you're interested in getting them to eat cheesecake, try putting whipped cream on top of your cake and have them decorate with candies such as: Skittles M&M's Mini Marshmallows Mini chocolate chips Mini Tootsie Rolls Fruit Rollups Banana Runts Malted Milk Balls Gummy Bears Or Worms Starburst Candies Twizzlers Life Savers Crushed Peppermint Crushed Peanut Brittle Marzipan Shapes Chocolate shapes & Curls Chocolate Mints Hershey's Kisses.
  58. *Cheesecake has got to be one of the most versatile desserts in the entire universe. From fresh fruits to canned fruits, to chocolates and candies, it can accommodate most anything the most creative imagination can dream up..
  59. Is also healthy for you. Especially if you're a Diabetic with a sweet tooth! I personally have a Vampire Cheesecake recipe that's packed with 40 cloves of garlic as well as one that's topped with Foie gras moouse and Beluga Caviar in my culinary repertoire! Now, I'm not suggesting you try those. Just know that there are far more garnish options than Cherry or Blueberry!.
  60. Face it, the garnish options are as endless as they are delicious! Follow these tips for as perfect of a cheesecake as you're ever going to make!.
  61. Let me know your favorite cheesecake recipes and toppings! Maybe you even have tips of your own you'd like to share with the world! I'd love to hear all of them!.

Jersey Mike's Subs makes a Sub Above – fresh sliced, authentic Northeast-American style sub sandwiches on fresh baked bread. Subs are prepared Mike's Way® with onions, lettuce, tomatoes, oil, vinegar and spices. SAN DIEGO — First "New York, New York" played over the Petco Park sound system Friday night, a handful of Rays players dancing outside their dugout Another Yankees season wraps up without a World Series appearance, and this one must sting immensely. Why go to the Cheesecake Factory to get a taste of this favorite dessert when you can make your own cheesecake at home with this recipe? Join to listen to great radio shows, DJ mix sets and Podcasts.

Recipe: Tasty Carbonara

Carbonara. Pasta alla carbonara) — спагетти с мелкими кусочками бекона (в оригинале, гуанчиале или панчеттой), смешанные с соусом из яиц, сыра пармезан и пекорино романо, соли и свежемолотого чёрного перца. For everyone who said that this Carbonara is too salty – table salt is double as salty as Kosher salt, so remember to cut the amount of salt in half if using table. X The legendary Antonio Carluccio finally makes his debut on Food Tube!

Carbonara 
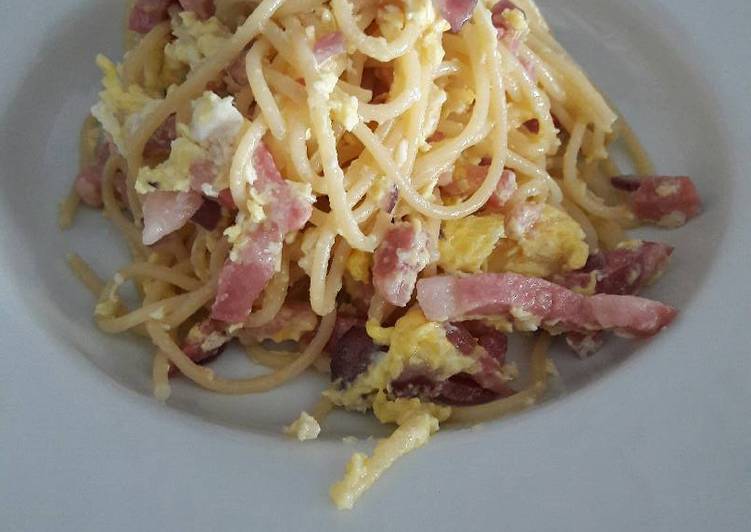
Classic Italian carbonara tastes even better when following these very unique and creative recipes. Authentic Pasta Carbonara is easy to make, full of bacon flavor, and smothered in Pasta carbonara originates in the Rome region of Italy. No one knows the exact story behind the origination of the dish. You can have Carbonara using 4 ingredients and 3 steps. Here is how you achieve that.

Ingredients of Carbonara

  1. It’s of spaghetti (enough for 2ppl).
  2. Prepare 150 of g/1pack smoked cubed bacon/pancetta affumicata.
  3. It’s 2 of eggs beaten.
  4. It’s 1 of red onion chopped.

One of the richest and most popular Italian dishes is also one of it's most deceptively complex. Though the dish only has a handful of ingredients, the best carbonara takes. This Creamy Carbonara is a plate of heavenly, creamy pasta. Silky spaghetti with crispy pancetta in a super creamy and cheesy sauce.

Carbonara instructions

  1. Place your spaghetti into a pan of boiling salted water..
  2. As soon as spaghetti starts cooking take a frying pan with extra Virgin olive oil on low heat and put in your bacon cook the same time as the spaghetti 2 minutes before spaghetti is ready add your onion..
  3. Once spaghetti is ready drain out and put into your frying pan with the other ingredients pour your beaten egg (you may also like to add pepper to your egg) Stir all your ingredients together until the egg is cooked..

Simply delicious and so easy to make them at home. Pasta Carbonara recipe is a simple Italian pasta recipe with egg, hard cheese, pancetta and pepper. Authentic Italian Pasta Carbonara Recipe – The Roman Traditional Dish. Learn how to make carbonara sauce with bacon or pancetta and loads of parmesan. Spaghetti Pasta Carbonara—indulgent and delicious, yet so easy!

Easiest Way to Cook Tasty Garlic and Herb butter crusted Tri Tip Roast

Garlic and Herb butter crusted Tri Tip Roast.

Garlic and Herb butter crusted Tri Tip Roast 
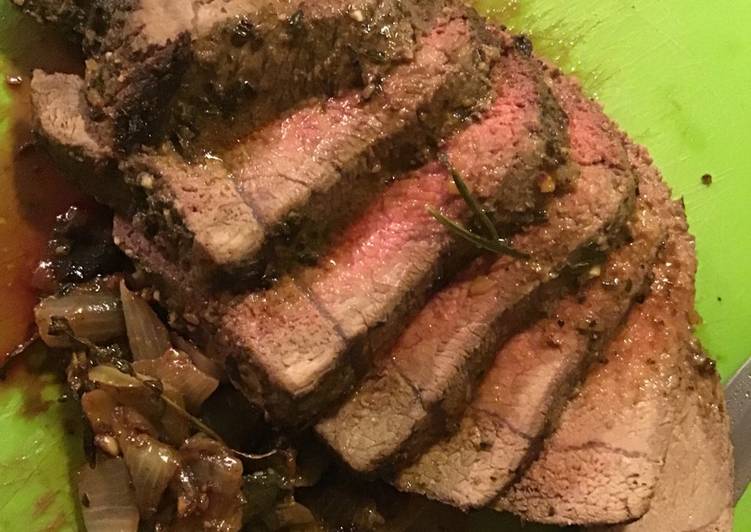
You can have Garlic and Herb butter crusted Tri Tip Roast using 14 ingredients and 5 steps. Here is how you cook that.

Ingredients of Garlic and Herb butter crusted Tri Tip Roast

  1. You need 2-3 Lb of Tri Tip Roast.
  2. You need of For Garlic Butter: ⬇️.
  3. Prepare 2 of Garlic Cloves.
  4. Prepare 12 oz of Salted or Unsalted butter, room temp.
  5. Prepare 3 sprig of fresh rosemary.
  6. Prepare 4 sprig of fresh Thyme.
  7. It’s 1 TBS of oregano.
  8. Prepare 1 TBS of parsley.
  9. You need 2.5 Teaspoon of Lemon pepper, AND white pepper.
  10. Prepare 2 Teaspoon of Dijon grain mustard.
  11. Prepare 1 TBS of Worcheshire sauce.
  12. You need 1/2 TBS of paprika.
  13. It’s 1/2 TBS of chopped dried onion, AND onion powder.
  14. It’s 1/2 TBS of Montreal Steak seasoning.

Garlic and Herb butter crusted Tri Tip Roast step by step

  1. Rub Montreal steak seasoning on Tri Tip Roast, let come to room temp.
  2. Combine all ingredients for Garlic and herb butter.
  3. Rub Garlic butter on room temp sirloin roast.
  4. Preheat Oven to 425*, put Roast in roasting pan or casserole dish, Roast 15-20 minutes per LB (about 30 minutes for Med Rare, 45 for medium) let rest 10-15 minutes.
  5. Serve with potato, gravy and vegetable!.

Recipe: Tasty Copy of Christie's comfort carbonara!

Copy of Christie's comfort carbonara!. Carbonara has been the subject of some severe bastardization here in the states, where we regularly eschew Italian tradition in favor of garlic, bacon, and. If you're craving a bowl of warm pasta but looking to watch your weight, chef Craig Strong has lighter versions of delicious meals. My mother had a peculiar habit when she cooked for us when I was a child.

Copy of Christie's comfort carbonara! 
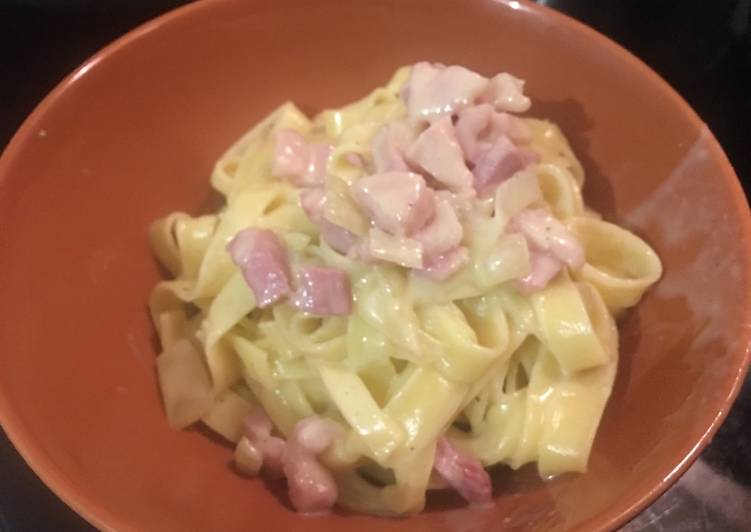
Traditional carbonara does not use cream, but I understand why the American version of carbonara is one that pleases the masses. Who could go wrong with that combination. So over the years, I have made pasta carbonara my way, and it contains a couple of twists that I know is. You can cook Copy of Christie's comfort carbonara! using 11 ingredients and 7 steps. Here is how you cook it.

Ingredients of Copy of Christie's comfort carbonara!

  1. Prepare 1 of garlic clove.
  2. It’s 200 g of Bacon Lardons.
  3. Prepare 1/2 of a large onion (chopped up).
  4. You need of Olive oil.
  5. It’s 1 packet of fresh made tagliatelle -.
  6. You need 4 tbs of grated Parmesan cheese.
  7. It’s 3 of egg yolks.
  8. It’s Pinch of black pepper.
  9. Prepare Pinch of salt.
  10. It’s 150 ml of Double Cream Light.
  11. You need 1/2 of a tea mug of pasta water (from the tagliatelle).

Carbonara has been the subject of some severe bastardization here in the states, where we regularly eschew Italian tradition in favor of garlic, bacon, and green peas for some reason. Today we're doing both the old-school and illegitimate versions of the hotly-contested dish, both of which deserve t. Carbonara has egg yolk, Pecorino Romano, guanciale, black pepper, and pasta. The first time I encountered carbonara in a professional sense was as an apprentice at a pub in Parramatta, a suburb in Sydney's less-glamourous western area where I grew up.

Copy of Christie's comfort carbonara! step by step

  1. Heat a pan up on medium-high heat with 2 tbsp olive oil. Rub one whole garlic clove over the bottom of the pan, and let sit..
  2. Add the chopped up onion and fry until soft.
  3. Add the bacon lardons to the onion. Cook until it begins to brown and the fat starts bubbling out of it. Take out the garlic clove..
  4. Cook the pasta as normal. When it's done take a tea mug and scoop some pasta water out. Set aside. Strain the pasta and let sit..
  5. In a small bowl, whisk together 3 egg yolks, 2 1/2 tbs of Parmesan cheese, 150ml of double cream and a pinch of black pepper and salt.
  6. Dump the pasta into the onion and bacon mixture and mix around. Turn the heat off on the stove (very important!). Pour the pasta water onto the pasta, quickly followed by the egg and cream mixture. Begin to mix the egg mixture and pasta together, taking care to work quickly so the egg doesn't cook in the hot pan..
  7. Sprinkle the rest of the Parmesan cheese onto the pasta as you are mixing the dish together! Enjoy 😊.

You want perfect strands of pasta glossed with a rich, silky sauce—not noodles tossed with scrambled eggs. Here's how to get pasta carbonara right, every time. Fantastic comfort food in the form of soft, home-made gnocchi in a rich and creamy Carbonara sauce. Today is the type of day they don't warn you about when you say you want kids/when I loved how the soft gnocchi soaked up all the creamy, eggy, bacony sauce. Perfect comfort food for a tired Monday.